

YOUR CART IS CURRENTLY EMPTY
How to do a site inspection before a brand activation
A site inspection is the walk-through you do weeks before an activation, while the design can still change. Its job is simple: make sure the build will get into the space, fit it, plug in and look right from where shoppers or guests will see it. A measurement missed on the site visit usually turns into a problem at bump-in.
Vicinity Centres' fit-out guidelines strongly advise a site visit by your team two weeks before bump-in, especially if you don't know the centre, so you know where the power is, the surrounding facilities and the entry and exit points. We'd go earlier if you can, before the design is signed off, and again closer to the date if anything has changed. Here's what to check, measure and photograph while you're there.
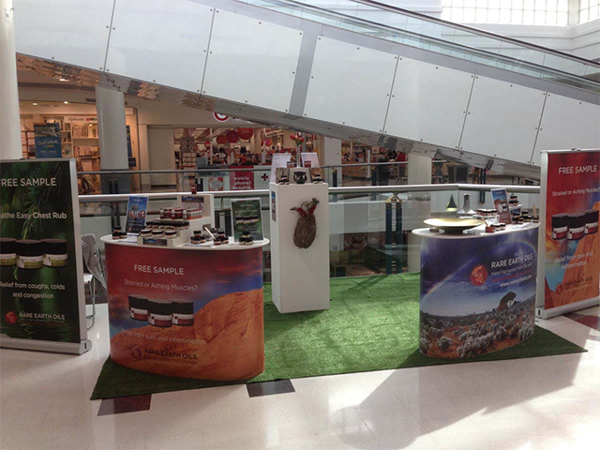
Before you go
- Ask centre management or the venue for the site plan and the bump-in pack. At Vicinity Centres, the key information is in the centre bump-in pack attached to your booking confirmation.
- Bring the draft design or the kit list, so you can test each piece against the real space.
- Pack a tape measure, a laser measure if you have one, and a phone with plenty of storage for photos.
- Book a time with the person who manages the space, so you can ask questions on the spot. Our shopping centre managers directory lists the managers of major Australian centres.
Our site inspection checklist
#1 - Walk the route from the vehicle to the site
Start where the van or truck will stop and walk every metre to the site, the way the kit will travel.
- Loading dock or bay: where it is, how you book it and how long you can stay. Harbour Town Gold Coast's casual leasing guidelines allow short-term unloading only at its loading bays, for a maximum of 15 minutes.
- Doors, lifts and corridors: measure the width and height of every door and the lift car on the route. Compare them with the largest packed case or panel, not the finished build.
- Trolleys: ask what you can use. Harbour Town asks casual leasing clients to bring their own trolleys and not use the supermarket's.
- Convention centres: check the dock doors too. ICC Sydney's exhibitor fact sheet lists a 5.6m wide x 4.5m high loading dock door for each of Halls 1 to 4.
#2 - Check the floor
- Surface: tiles, polished concrete, carpet or timber. Note anything uneven, any drains and any floor boxes.
- Fixing and tape: ask whether anything can be fixed or taped down. Dalby Shoppingworld's terms say no tape is to be used on its floors, because it can damage the seal coat.
- Wheels: if the kit or a display vehicle rolls in, ask about floor protection. Dalby asks for carpet or cardboard under the wheels of any wheeled item on display.
- Load: heavy items need a floor that can take them. Ask the venue for the figure. At ICC Sydney the exhibition halls are rated at 20 kPa, while The Gallery level is rated at 5 kPa, so the same build can be fine in one room and not in another. For a heavy single item, such as a vehicle or a loaded fridge, give the venue its weight and footprint and ask them to confirm it.
#3 - Find the power
- Is there power at the site? Not every site has it. Harbour Town says all its casual leasing sites are powered; at Mount Sheridan Plaza, a powered site costs more than a standard one.
- Where is the outlet? Measure the distance from the outlet to where each screen, light or fridge will sit, and note the route a lead would take.
- How will cables be covered? Vicinity Centres requires cables to be secured and concealed with centre-approved cable covers, and says any kind of tape is not sufficient.
- What will you plug in? List every item and ask whether the circuit can take it all at once.
- Test and tag: check every appliance and lead is in date. Vicinity Centres requires up-to-date test and tag by qualified personnel, and the Cannon Hill Kmart Plaza guidelines say all leads, new ones included, must be tested and tagged by a qualified electrician.
#4 - Measure the space
- The footprint: measure the length and width, and photograph any floor markings. The display guidelines published by Cannon Hill Kmart Plaza say kiosk sites are marked on the floor with decals, and everything (chairs, stands and signage included) must stay inside them.
- Height: measure the ceiling, bulkheads, signs and sprinkler heads above the site, then ask for the height limit. Vicinity Centres limits displays in standard mall sites to 1,400mm, and allows up to 1,800mm in activation sites such as centre courts, as long as the design doesn't block the line of sight to surrounding retailers.
- Room to work: the footprint the centre quotes is only where the equipment sits. Allow for staff, a queue and clear passage too; our guide to how much space a shopping centre activation needs works through it.
#5 - Look at sightlines, neighbours and foot traffic
- Stand where shoppers will first see the site, from each direction, and photograph the view. Decide which side the main graphic should face.
- Note the shops on either side and opposite. A tall wall that blocks a retailer's shopfront is the sort of thing a centre will ask you to change.
- Watch the foot traffic at the time of day you'll be busiest: where people walk, where they stop and where they queue.
- Note anything that competes for attention, such as screens, music or another promotion nearby.
#6 - Check the edges: balustrades, voids and exits
- Measure the distance from the site to any balustrade or void. Vicinity Centres asks that a kiosk within 1.5m of a void or balustrade, and any furniture around it, be placed so nobody can climb up and over the balustrade.
- Find the nearest fire exits, hose reels and emergency signs, and make sure the layout keeps them clear.
- Note escalator landings and lift doors, where people bunch up.
#7 - Ask about storage and staff facilities
- Storage: don't assume there is any. Mount Sheridan Plaza's casual mall leasing agreement says the centre does not provide storage, and the Cannon Hill Kmart Plaza guidelines note that storage, where a centre has it, costs extra.
- Staff: find the toilets, a place for breaks and somewhere to keep personal items out of sight. Vicinity Centres asks for enough storage to be built into the display for this.
- After hours: ask how you get in before trading for bump-in and restocking, and who to call in security.
#8 - Take the right photos
Take more photos than you think you need, and include something for scale (a person or the tape measure):
- The site from each approach, at shopper eye level.
- The site straight on, with the floor markings visible.
- The ceiling above the site.
- Each power outlet, and the route to it.
- The loading dock, and every door, lift and tight corner on the route.
- Neighbouring shopfronts and any balustrade or exit nearby.
- The floor surface close up.
Who to meet on the day
- Centre management or casual leasing: confirms the site, the height limit, power and the bump-in pack.
- Security: after-hours access, the loading dock and who to call during bump-in.
- At a venue: your event manager, who can tell you about floor loading, power orders and rigging.
Write down each person's name, role and mobile number before you leave.
After the visit
Send the measurements, photos and contacts to your build team the same day, while the details are fresh. If the site has changed since the design was drawn, fix the design now, not at bump-in. The night before or the morning you open, do a final walk-through as well: see our list of what to check before an event opens.
Our national installation and pack-down team works with all the major shopping centres and deals with event organisers for you. Send us your site photos and measurements, or call 1300 240 250, and we'll check the design against them before it goes into production.