

YOUR CART IS CURRENTLY EMPTY
How do I outline text in Illustrator, Photoshop or InDesign?
What does it mean to outline a font?
Outlining fonts involves turning text into objects. This process means the font files do not need to be installed on another computer for the files to open correctly.
Why do I need to outline fonts?
When an artwork file is opened on another computer system it will search that system for the fonts in the file. If it cannot find the fonts it will offer to substitute the font, or open with a default font. Either is not satisfactory for reliable reproduction of the artwork. Even if it substitutes with a font of the same name, that font could be slightly different, rendering unpredictable results.
Outlining prevents this from happening by converting the text to vector shapes, so the computer no longer treats it as text. Be sure to proof your text before outlining, because it cannot be edited afterwards. It is advisable to keep an original master file with the fonts still in place. This can be referred to if required.
Outlining fonts in Adobe Illustrator
1. Make sure all layers are unlocked. In the main menu, go to Window > Layers, then click the lock icon on any locked layer to unlock it.
Note: To unlock several layers at once, drag down through the lock column.

2. Select all fonts. To be sure everything is selected, in the main menu, go to Select > All. It doesn’t matter if non-text objects are also selected.
Note: Locked or hidden text isn't selected, so go to Object > Unlock All and Object > Show All first.
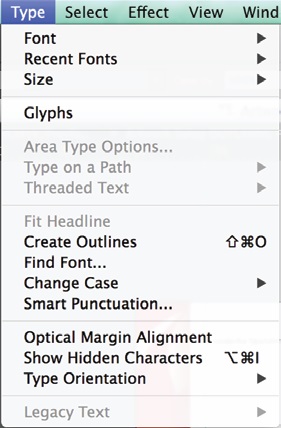
3. Create the outlines. In the main menu, go to Type > Create Outlines, or press Shift + Ctrl + O (Windows) or Shift + Command + O (macOS).
To be sure all fonts are outlined, select the lettering. Outlined text shows anchor points (nodes) on every letter, like the sample below.

4. In the main menu, go to File > Save As and save the file with a new name. This keeps your original master file, with live text, untouched.
Note: If the Save to Creative Cloud dialog box appears, select On your computer.
Outlining fonts in InDesign and Photoshop
In InDesign, select the text frame with the Selection tool, then go to Type > Create Outlines. In Photoshop, select the text, then go to Type > Convert to Shape.
Need some help?
We're here for you
If you're needing some advice or just a helping hand, please get in touch with our team, by clicking this button. Complete the enquiry form and one of our specialists will call you back as soon as we can.